Friday, January 24, 2014

Pinterest Dinner #1 - Spicy Black Bean Wrap with fresh Salsa

I really enjoyed this recipe, mostly because of how fresh it tasted.  It is a good twist on salad.  And it is pretty filling too.  I did not use the sprouts as seen here (our store was all out :( ), but I believe they would make a great addition.  

The best part about this meal is that it came together in under ten minutes!  Great for if you are in a hurry!

Mmmm this looks amazing!!  **spicy black beans with chipotle avocado sauce, cilantro, tomato, lettuce, cucumber, red onion, & sprouts.

Ingredients

Whole Wheat Tortillas
1 Cucumber
1 Tomatoes
Mixed Greens
1 can of Black Beans
2 medium Avocados
A pinch of Salt
Fresh lime juice or zest

First mash up your avocados in a bowl.  Get it to a spreadable consistency and then add a bit of salt and lime juice.  

Chop up all veggies into bite sized pieces.  Then take your tortilla and spread a little (or a lot) of the avocado and lime juice mixture.  Put on your desired amount of all other ingredients.  Wrap up and enjoy!


As a pre-dinner snack I made a chunky salsa.  Although I am not personally a huge fan of cilantro, this definitely hit the spot for the snackers in our house.  

Ingredients

1 heaping spoon of garlic (Caned or two cloves of fresh)
1/4 red onion chopped
1/4 bunch of cilantro (you can use more....again I like my cilantro to be muted)
3 tomatoes, diced
A dash of salt and red pepper flakes

Here is the best part, after chopping everything just mix it together in a bowl and put it in the refrigerator for 10 minutes or more.  It stores really easy and goes well with chips!  All in all this part took me less than 10 minutes as well. 


Do you guys have any favorite clean eating wraps you enjoy?  Let me know about them.

The next meal I am going to tackle is sesame chicken in the crock pot!  Yum. 

How to Hold a Knife and De-seed an Avocado


One of the first lessons I was taught in my culinary classes was how to hold a knife properly.  I could not believe I had been holding it wrong for almost 20 years.  Here is how I had learned to hold a knife:


And here is how you are supposed to hold it:


At first it feels so strange to grip the blade.  But once you get used to the awkwardness, you have so much more control over you chopping and dicing.  The knife will slip less and your cuts will be smoother.  I must warn you that I would not hold any knife smaller than a chefs knife  like this.  Holding a paring knife like this might get a bit dicey.....haha do you see what I did there? 

Right, no more laughing at my own jokes. 

Instead here is a handy chart with some more knife tips:

Knife Smarts

My second tip of the day is how to de-seed an avocodo.  I had always tried to dig the seed out with a spoon.  That usually resulted in the seed flying across the room and landing on the floor leaving me with a mess to clean up.  Well one day when my Dad was visiting he showed me this trick - 


Take your knife and hit the seed with the sharp edge so it sticks.  Then gently twist the blade and the seed comes right out.  There is no launching of fruit, just a very calm removal and no mess!  


Tuesday, January 21, 2014

Well thats Pinteresting.....

Ok folks, so here is the deal.  For those of you who are on Pinterest I am sure that you know by now how easy it is to "pin" something and then forget about it.  I occasionally make something from my pins, but unfortunately many of them have gone un cooked or baked. 
 
It's time to change that.
 
Thus I am beginning the Pinterest challenge. Starting this Sunday, I am going to cook and bake my way through all of my pins.  That should liven up our menu a bit!  I will record it all here and don't worry I will include recipes and how to's.  Wish me luck.
 

Friday, August 16, 2013

Gooey Chewy Brownies

We love brownies at our house, but they have to be chewy brownies.  Box brownies are ok....but most of the time they come out too cakey (is that even a word? It is now!) and crumbly.  That certainly does not pass our bar.  Nope we need gooey goodness.  :)  

The best part about this recipe was that it was not me that found it, it was the hubbs.  Go figure that he is not a huge fan of super chocolaty things, but loves brownies.  I just don't try to understand it.  Anywho, he found this fantastic recipe on America's Test Kitchen's website.  For those of you who have never seen the show, it is also fantastic! They have chefs, and food scientists who try to find out the best way to cook everything from pulled pork, decadent deserts and everything in between.  They also give great tips on what tools to use.  But that is enough of my plug for their show, on to the recipe.   I made a few tweaks to it:

I would suggest that you first gather everything you need.  It comes together quicker if you lay it all out on a table somewhere before you start.  


I find that it is easier to use a scale when baking items.  Your baked goods have a much higher chance of coming out right if you measure the ounces of ingredients you need rather than use cups and tablespoons.  It's just a personal preference though. 


First things first.  Mix together the boiling water and coco powder.  Mix until the coco is completely dissolved.  Then add in your first round of chopped chocolate.  The water should still be hot enough to melt the chocolate completely.  After that melts, mix in the butter, oil, eggs and egg yolks, vanilla, and sugar. Mix until all of the sugar is dissolved and it looks glossy as seen below.  ( It really does not take to long.) 


Then we mix in the flour and salt.  DON'T OVER MIX IT!!!  You see flour has this stuff in it called gluten.  Long story short, the more you mix it, the tougher your product will become.  That is good in some things but not for our brownies.  So just mix it in until there is no more white in your bowl.  


Now it's time to prep your pans.  Pre-heat the oven to 350 degrees Fahrenheit (175 for all you metric folks out there :) Then line your pan with tinfoil.  Make sure you use a good sturdy tinfoil.  The thinner it is the more likely it is that it will tear when coming out of the pan.  I really like Reynolds Wrap.  The size of the pan does not matter so much.  If you want thicker brownies use a smaller pan :)


Pour in the batter!


And now chop up six ounces of your favorite type of chocolate!  I always enjoy a good toffee crunch in my brownies, so I went with the Hershey's Nuggets.  Really any type of milk or white chocolate would work.  I am sure you could even experiment with candy bars.  Hmm sounds promising.  Anywho, chop it up and toss it on top of the batter in the pans.  No mixing it in now! Just toss it on and put in that oven. 


Cook your brownies at 350 for 30-35 minutes.  If you used a larger pan, take it out at the 30 minute mark.  Insert a toothpick and if it comes out with no batter on it, let them cool.  IMPORTANT - let them cool for 10 minutes, remove them from the pan and then let them cool on a rack for AT LEAST an hour and a half!  If you try to eat them too soon they will be too gooey.  The brownies retain some heat and continue to cook even after being removed from the oven.  This same thing happens with meat. Have you ever cooked a piece of chicken to perfection in the pan, but then wondered why it was dry when you went to eat it later?  Now you know.  


Lastly, enjoy your brownies!  

Ingredient List - 

1/3 cup dutch processed cocoa
1/2 cup boiling water
2 oz unsweetened chocolate finely chopped
4 tbsp unsalted butter melted
1/2 cup plus 2 tbsp veggie oil
2 large eggs
2 large egg yolks (Mmm save the whites and throw them in omlets!)
2 teaspons vanilla
2 1/2 cu sugar
1 3/4 cup flour
3/4 teaspons table salt
6 oz your favorite type of chocolate

Sunday, April 21, 2013

Thai Steak & Noodle Salad

 Happy Sunday everyone!  This week while grocery shopping we found an awesome deal on steak ($9 for five!), so I decided it was time to try out a new recipe I have had my eye on!  

I like to reserve Sunday for meals that will take a bit longer to prepare, but I was pleasantly surprised at how quickly this meal came together! It is a fairly light tasting salad but allows you indulge a bit by eating steak! 

The hardest part about cooking it would be making sure you cook the steak to your liking.  It helped me to cook the steaks individually.  Make sure that you allow it to rest after you are done cooking it!  Other than that it is quite simple.  Enjoy!


THAI STEAK & NOODLE SALAD

*serves 4
  • 3 tablespoons fresh lime juice
  • 1 tablespoon Asian fish sauce - We did not have fish sauce so we used a mushroom soy sauce
  • 1 tablespoon agave nectar
  • 1 tablespoon sesame oil
  • 1 red Thai chile, sliced paper-thin
  • zest of one lime
  • 1/2 lb flank steak
  • purchased Asian marinade - We used a teryaki marinade
  • fresh or dried linguine
  • Salt and freshly ground pepper
  • 2 scallions, thinly sliced
  • 1/2 cups mint leaves, torn
  • 1/4 cup cilantro leaves, torn
  • 1/2 cup basil leaves, torn
  • 4 cups shredded cabbage (or arugula – your preference!)
  • 1 mango, chopped
  • 1 cup cherry tomatoes, halved
  • 1 small avocado, chopped
  • 1/2 cup chopped salted roasted peanuts, plus 2 tablespoons for garnish
  • Lime wedges and basil leaves, for serving
  1. Marinate the flank steak in Asian marinade for 2 hours.
  2. In a bowl, combine the lime juice with the fish sauce, agave, oil, chile, & lime zest.
  3. Cook the linguine until al dente, drain and toss with a little oil.
  4. Grill the flank steak 4 minutes per side, let rest 4 minutes before slicing thinly against the grain.
  5. In a bowl, toss scallions, mint, cilantro, basil, field greens, mango, cherry tomatoes, avocado & 1/2 cup peanuts with dressing. Toss in the noodles, then the beef. Mound the salad on plates or in a big family-style bowl in the center of the table. Sprinkle with remaining peanuts and serve with lime wedges and basil leaves.
Both the image and recipe were taken from this wonderful website!!

Tuesday, April 16, 2013

Blueberry Lemon Pound Cake

Every once in a a while I crave the delectable paring of lemons and blueberries.  Not only do they taste great together, but they look good on a plate too!  This time the answer to my craving came in the form of a very yummy pound cake. 

Pro's - It came out quite moist and held together well.  It frustrates me so much when a cake is crumbly and dry, so I was happy to find that this cake passed the moist test with flying colors.  For you lemon lovers out there, this is the cake for you! The taste is not over powering, but you defiantly can taste the zing of lemon on the end of each bite. While it is a thicker cake, it can be made with low-fat ingredients, making it a little easier on the thighs :)

Con's- My only beef with this delicious desert was that if left to sit for more than three days it began to dry out. To combat this I would suggest eating it with lots of hungry friends. 

Tips and tricks - 

One of the biggest steps that I think most people overlook while baking is the importance of creaming certain ingredients for the correct amount of time. For instance, the more time you take mixing your eggs into your batter (one at a time as the recipe usually asks you to do) you will add more volume and texture to your batter. 


One of my favorite tools in my kitchen is this juicer.  It may look like it requires a little muscle to make it work, but in reality is on of the easier hand juicers I have ever used.  It keeps the seeds out of your batter and gets almost every bit of juice out of a lemon you could ask for.  Mine was given to me, but I believe it can be found here at Sur La Table for $13.95. 

It also helps to microwave lemons for five to ten seconds just before you juice them.  This will optimize the amount of juice you get out of your fruit. 


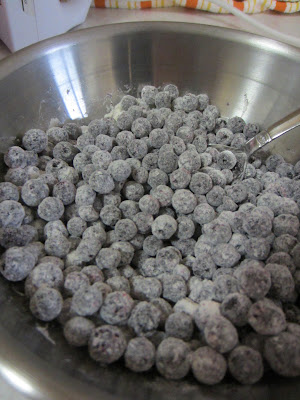
Up to this point you have mixed all of your liquds together.  Toss the blueberries with flour. 


Then add your dry ingredients......


Mix in the yogurt....


Put it in a pan or two......


Bake and enjoy!


Blueberry Lemon Pound Cake

1 3/4 cups granulated sugar
1/2 cup butter, softened
1/2 cup low fat cream cheese, softened
3 large eggs
zest of one whole lemon
1/4 cup freshly squeezed lemon juice
2 tsp vanilla
3 cups all-purpose flour, DIVIDED
2 cups fresh or frozen blueberries
1 tsp baking powder
1/2 tsp baking soda
1/2 tsp salt
1(8oz) carton of non-fat lemon yogurt.....can use vanilla if you don't have lemon

Lemon Icing - 

1/2 Cup sifted powdered sugar
4 tsp lemon juice (I used 2 tsp lemon and 2 tsp lime juice)

Instructions
- Preheat oven to 350 degrees Fahrenheit (177 degrees centigrade) 

- In a large mixing bowl whip the butter for 2-3 minutes until creamy.  Add in the sugar and cream cheese and mix until creamy.  Next add in the eggs one at a time! Make sure to mix the batter for 1-2 minutes after each addition. Then add in the vanilla, lemon juice and lemon zest. 

- In a small bowl mix the blueberries with 2 tbsp of flour.  Mix until all of the berries are covered. 

- Add the remaining flour, baking powder, baking soda, and salt to the mix.  Then add in the yogurt and blueberries. 

 - Pour mix into two pans that have been prepped with cooking spray.  Tap the pans on the counter to get rid of any nasty air pockets in the cake and put 'em in the oven!  Bake at 350 for 1 hour.  

- DON'T FORGET - cool your cake for ten minutes in the pan.  If you try to get it out sooner you will only tear it apart.  After ten minutes loosen the sides and bottom with a fork and then remove.  Combine the powdered sugar and citrus juice to make a lovely icing and drizzle over the top of the cakes.  Give them a few more moments to rest, then enjoy! 

Thanks for stopping by!  Happy eating!